Fine-tune Your Google Docs Margins For Flawless Document Presentation
When it comes to creating a polished and professional-looking document, margins play a crucial role. Google Docs, a widely used word processing tool, offers comprehensive margin customization options to cater to various document needs.
Margins refer to the blank space surrounding the text on a page. In Google Docs, you can adjust the margins for the top, bottom, left, and right sides of the page independently. This allows you to control the amount of white space around your content, ensuring readability, visual appeal, and consistency throughout your document.
Properly set margins contribute to several benefits. Firstly, they enhance the overall readability of your document by providing ample space between the text and the page edges. This makes it easier for readers to focus on the content without feeling overwhelmed or cramped. Secondly, margins create a visually balanced and professional appearance. They prevent the text from appearing cluttered or crowded, giving your document a polished and organized look. Thirdly, margins can help guide the reader's eye through the document, directing their attention to specific sections or elements.
- Cast Of Halloween 2 1981
- Taylor Swifts Parents Reconcile
- What Height Is Chappell Roan
- Jacob Elordi Pirates Of The Caribbean
- Vin Diesel Gal Gadot
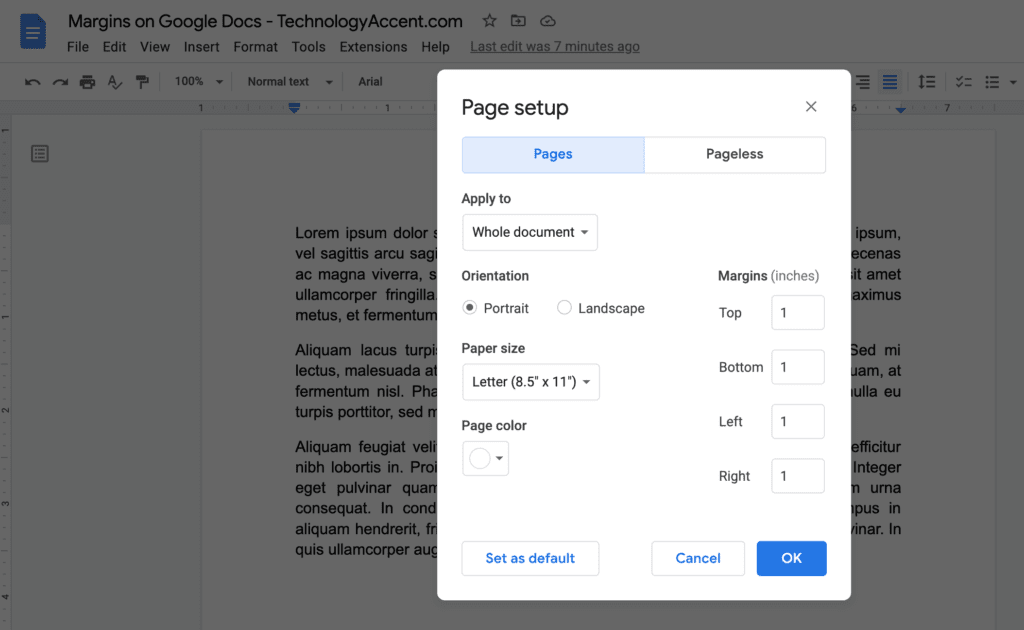
Adjusting margins in Google Docs is a straightforward process. Simply go to the "File" menu, select "Page setup," and then make your desired changes in the "Margins" section. Google Docs also provides pre-defined margin presets, such as "Normal," "Wide," and "Narrow," which can be quickly applied to your document.
In conclusion, Google Docs margins are a valuable tool for creating visually appealing and professional-looking documents. By understanding their importance and utilizing the customization options available, you can effectively control the layout and readability of your content, ensuring a positive reading experience for your audience.
Google Docs Margins
Margins play a crucial role in the appearance and readability of Google Docs documents. Here are seven key aspects to consider when setting margins:
- Sean Evans Height
- Jarrod And Brandi Storage Wars
- June 13 Zodiac
- Johnny Depp Upcoming Movies 2024
- Jason Beghe
- Top margin: Controls the space between the top edge of the page and the first line of text.
- Bottom margin: Controls the space between the last line of text and the bottom edge of the page.
- Left margin: Controls the space between the left edge of the page and the text.
- Right margin: Controls the space between the right edge of the page and the text.
- Mirror margins: Sets the left and right margins to be equal, and the top and bottom margins to be equal.
- Custom margins: Allows you to set specific values for each margin, independent of the other margins.
- Predefined margins: Google Docs provides several predefined margin presets, such as "Normal," "Wide," and "Narrow," which can be quickly applied to your document.
These margin settings give you flexibility in controlling the layout and appearance of your document. For example, you may want to use wider margins for a formal document or narrower margins for a document that will be printed on a smaller page. By understanding and adjusting these margin settings, you can ensure that your Google Docs documents are visually appealing and easy to read.
1. Top margin: Controls the space between the top edge of the page and the first line of text.
The top margin in Google Docs plays a significant role in the overall appearance and readability of your document. By adjusting the top margin, you can control the amount of white space between the top edge of the page and the first line of text, which can impact the visual appeal, emphasis, and functionality of your document.
- Visual Appeal: A well-adjusted top margin can enhance the visual appeal of your document by creating a balanced and aesthetically pleasing layout. Too little white space can make your document appear cluttered and overwhelming, while too much white space can make it look empty and uninviting. By finding the right balance, you can create a document that is both visually appealing and easy on the eyes.
- Emphasis: The top margin can also be used to emphasize certain elements of your document. For example, increasing the top margin above a heading or title can help to draw attention to it and make it stand out from the rest of the text. This technique can be particularly useful for organizing and structuring your document, as it allows you to visually separate different sections or ideas.
- Functionality: In some cases, the top margin may also serve a functional purpose. For example, if you are creating a document that will be printed and bound, you may need to increase the top margin to accommodate the binding. Additionally, if you are including a header or footer in your document, you may need to adjust the top margin to ensure that there is enough space for these elements.
Overall, the top margin in Google Docs is a valuable tool for controlling the appearance, readability, and functionality of your document. By understanding its role and its customization options, you can create documents that are both visually appealing and effective.
2. Bottom margin: Controls the space between the last line of text and the bottom edge of the page.
The bottom margin in Google Docs plays a crucial role in the overall appearance and functionality of your document. By adjusting the bottom margin, you can control the amount of white space between the last line of text and the bottom edge of the page, which can impact the visual appeal, readability, and overall impact of your document.
- Visual Appeal: A well-adjusted bottom margin can enhance the visual appeal of your document by creating a balanced and aesthetically pleasing layout. Too little white space can make your document appear cluttered and overwhelming, while too much white space can make it look empty and uninviting. By finding the right balance, you can create a document that is both visually appealing and easy on the eyes.
- Readability: The bottom margin can also affect the readability of your document. A sufficient bottom margin provides a visual resting point for the reader's eyes, making it easier to read and comprehend the text. Too little white space at the bottom of the page can make it difficult for readers to focus and follow the flow of the text.
- Functionality: In some cases, the bottom margin may also serve a functional purpose. For example, if you are creating a document that will be printed and bound, you may need to increase the bottom margin to accommodate the binding. Additionally, if you are including a footer in your document, you may need to adjust the bottom margin to ensure that there is enough space for this element.
Overall, the bottom margin in Google Docs is a valuable tool for controlling the appearance, readability, and functionality of your document. By understanding its role and its customization options, you can create documents that are both visually appealing and effective.
3. Left margin: Controls the space between the left edge of the page and the text.
In Google Docs, the left margin plays a crucial role in organizing and presenting your document's content. By controlling the amount of white space between the left edge of the page and the text, you can enhance readability, achieve visual balance, and maintain consistency throughout your document.
Readability: An appropriate left margin improves the readability of your document by providing a comfortable visual starting point for each line of text. Sufficient white space on the left margin prevents the text from appearing cramped or crowded, making it easier for readers to focus and comprehend the content.
Visual balance: The left margin contributes to the overall visual balance of your document. By adjusting the left margin, you can create a balanced and aesthetically pleasing layout. A suitable left margin ensures that the text is not squeezed to one side of the page, resulting in a more polished and professional appearance.
Consistency: Maintaining a consistent left margin throughout your document is essential for creating a cohesive and organized look. When the left margin is consistent, readers can easily navigate and follow the flow of your content without visual distractions. This consistency enhances the overall readability and user experience of your document.
Understanding the importance of the left margin in Google Docs empowers you to create visually appealing and effective documents. By carefully adjusting the left margin, you can optimize readability, achieve visual balance, and maintain consistency, ultimately enhancing the overall impact and professionalism of your work.
4. Right margin: Controls the space between the right edge of the page and the text.
The right margin in Google Docs plays a crucial role in enhancing the readability, visual appeal, and overall effectiveness of your document. By controlling the amount of white space between the right edge of the page and the text, you can optimize the layout and create a polished and professional-looking document.
One of the primary functions of the right margin is to improve readability. A sufficient right margin provides a visual resting point for the reader's eyes, making it easier to follow the flow of text and comprehend the content. Cramped text with narrow right margins can strain the eyes and hinder comprehension, especially for extended reading sessions.
Moreover, the right margin contributes significantly to the visual appeal of your document. A balanced right margin creates a sense of harmony and order, preventing the text from appearing cluttered or overwhelming. By adjusting the right margin, you can create a visually pleasing layout that is both inviting and easy on the eyes.
Furthermore, maintaining consistency in the right margin throughout your document is essential for a cohesive and professional appearance. When the right margin is consistent, it creates a sense of unity and organization, making it easier for readers to navigate and locate specific information. In contrast, inconsistent right margins can disrupt the flow of the document and create a disjointed reading experience.
Understanding the importance of the right margin in Google Docs empowers you to create polished and effective documents. By carefully adjusting the right margin, you can enhance readability, improve visual appeal, and maintain consistency, ultimately making your documents more impactful and user-friendly.
5. Mirror margins: Sets the left and right margins to be equal, and the top and bottom margins to be equal.
In the realm of document formatting, "mirror margins" hold a significant place within the broader context of "Google Docs margins." This specific margin setting offers a unique approach to balancing the white space surrounding your document's content.
- Symmetry and Harmony: Mirror margins prioritize symmetry by ensuring that the left and right margins, as well as the top and bottom margins, are of equal measure. This creates a visually harmonious and aesthetically pleasing document that exudes a sense of order and cohesion.
- Simplified Margin Management: By mirroring the margins, you streamline the process of margin adjustment. Instead of setting each margin individually, you can simply modify one value, and the corresponding margins will automatically adjust to maintain the symmetrical balance.
- Consistency Across Documents: Mirror margins promote consistency throughout multiple documents. When applied as a default setting, it ensures that all your Google Docs creations adhere to the same margin configuration, eliminating the need for manual adjustments and reducing the risk of inconsistencies.
- Compatibility with Predefined Templates: Many pre-designed templates in Google Docs utilize mirror margins as the default setting. This ensures that your content seamlessly integrates with the template's design, providing a professional and polished look from the outset.
In essence, mirror margins offer a convenient and aesthetically pleasing approach to managing margins in Google Docs. They simplify margin adjustments, promote consistency, and enhance the visual appeal of your documents.
6. Custom margins: Allows you to set specific values for each margin, independent of the other margins.
Within the realm of "google docs margins," the concept of "custom margins" holds a position of great significance. Custom margins empower you to exert precise control over the spacing around your document's content, granting you the flexibility to tailor the margins to your specific needs and preferences.
Unlike predefined margin settings, which apply uniform values to all margins, custom margins allow you to define unique measurements for each margin independently. This granular level of control is particularly valuable in scenarios where you require a specific layout or need to accommodate unique content elements.
For instance, if you are creating a document that includes wide tables or images, you may want to increase the left and right margins to provide ample space for these elements without affecting the top and bottom margins. Alternatively, if you are working with a document that will be bound, you may need to increase the left margin to accommodate the binding while keeping the other margins the same.
Custom margins also prove beneficial when working with multi-page documents or collaborating with others. By setting custom margins, you can ensure consistency across all pages and avoid unexpected shifts in content layout due to different margin settings.
In summary, custom margins in "google docs margins" provide unparalleled flexibility and control, enabling you to create documents that precisely meet your design requirements and enhance the overall readability and visual appeal of your content.
7. Predefined margins: Google Docs provides several predefined margin presets, such as "Normal," "Wide," and "Narrow," which can be quickly applied to your document.
Within the realm of "google docs margins," predefined margins serve as a valuable tool for quickly and easily setting consistent margins throughout your document. These predefined presets offer a range of options to suit various document types and preferences.
- Convenience and Efficiency: Predefined margins eliminate the need for manual margin adjustments, saving you time and effort. Simply select the desired preset, such as "Normal" for standard margins or "Wide" for increased spacing, and Google Docs will automatically apply the appropriate values to all margins.
- Consistency Across Documents: By utilizing predefined margins, you can ensure consistency in the layout and appearance of multiple documents. This is particularly beneficial when working on collaborative projects or creating a series of related documents that require a uniform presentation.
- Compatibility with Templates: Many pre-designed templates in Google Docs are created with specific predefined margin settings. Using these templates ensures that your content seamlessly integrates with the template's design, providing a polished and professional look from the outset.
- Customization Options: While predefined margins provide a convenient starting point, Google Docs also allows you to customize these settings further. You can fine-tune the margins to meet your specific requirements, ensuring an optimal layout for your document.
In summary, predefined margins in "google docs margins" offer a convenient and efficient way to set consistent margins across your documents. They provide a range of options to suit different needs, enhance collaboration, and ensure compatibility with templates. By leveraging these presets and customizing them as needed, you can streamline your workflow and create polished, professional-looking documents.
FAQs on Google Docs Margins
This section addresses frequently asked questions regarding "google docs margins," providing clear and informative answers to common concerns and misconceptions.
Question 1: What is the significance of margins in Google Docs?
Answer: Margins play a crucial role in the appearance, readability, and overall impact of your Google Docs documents. Well-adjusted margins enhance visual appeal, improve readability, and ensure a polished and professional presentation.
Question 2: How can I adjust margins in Google Docs?
Answer: Adjusting margins in Google Docs is simple. Go to the "File" menu, select "Page setup," and then make your desired changes in the "Margins" section. You can set custom margins or choose from predefined margin presets, such as "Normal," "Wide," and "Narrow."
Question 3: What is the difference between custom margins and predefined margins?
Answer: Custom margins allow you to set specific values for each margin, independent of the other margins. This provides precise control over the spacing around your document's content. Predefined margins, on the other hand, apply uniform values to all margins, offering a quick and easy way to set consistent margins.
Question 4: What are some best practices for setting margins?
Answer: For optimal readability, use wider margins for longer documents and narrower margins for shorter documents. Consider the purpose and audience of your document when selecting margins. For formal documents, wider margins may be more appropriate, while narrower margins may be suitable for informal documents.
Question 5: How do margins affect the overall appearance of a document?
Answer: Margins significantly impact the visual appeal of your document. Balanced margins create a sense of order and professionalism. Proper margins also prevent the text from appearing cluttered or cramped, enhancing the overall readability and user experience of your document.
Summary: Understanding and effectively utilizing margins in Google Docs is essential for creating visually appealing, readable, and polished documents. By addressing common questions and providing clear guidance, this FAQ section empowers you to confidently manage margins and enhance the quality of your Google Docs creations.
Transition to the next article section: Having explored the significance and usage of margins in Google Docs, let's now delve into advanced margin settings and their impact on document design.
Conclusion
Throughout this exploration of "google docs margins," we have delved into their significance, types, and effective usage within Google Docs. Margins play a crucial role not only in enhancing the visual appeal of your documents but also in improving readability and ensuring a professional presentation. By understanding the concepts of top, bottom, left, right, mirror, custom, and predefined margins, you are now equipped to make informed decisions when setting margins in your Google Docs creations.
Remember, well-adjusted margins contribute to a polished and organized document that effectively conveys your message to the reader. As you continue to work with Google Docs, experiment with various margin settings to find what works best for your specific needs. By mastering the art of margin management, you will elevate the quality of your documents and leave a lasting impression on your audience.
- Why Did The Little Couple Get Divorced
- Evan James Springsteen
- Brad Pitt Brothers And Sisters
- Simon Cowell Son
- Waylon Jennings Children
![How to Change All Margins in Google Docs [FAQ]](https://lh6.googleusercontent.com/ExTZ3MQn28pfm1e4KgZFKyi4Iq62DPkDLL7F5ys8V4ClU7ssuQGnodKSXA_CYRBJHYRQpLYYk8M3xXzA9VtFnxsEVmOk2KVjwzK2QcIiEp2SI6mD8nAPW_j21cb9j5OJZJqu7ok7)
How to Change All Margins in Google Docs [FAQ]

How to Change Margins In Google Docs Marketedly
How to put 1 inch margins on Google Docs Step by step Technology Accent
